when i come across to buildup my own LAB to practice the VMware vSphere5.0 (Install, Configure & Manage) the entire setup installation and configuration AD, hypervisor were completed but when reached to the storage i.e. network storage then i got stucked as i was not having the SAN or NAS box to complete my lab exercises nor its cheap to procure for an individual for a while.
After googling for a long I found somewhere, again thanks to the virtualization technology of the FreeNAS which is allowing you to configure your own Storage Server on VM or on the old physical PC's we have.
I will write you the detailed steps to install and configure FreeNAS for your home or office or lab.


Go to services and
click on button for CIFS. Browse your network place or directly enter UNC path
for your share on NFS server and share name in my case \\192.168.2.5\winshare. Rest is yours
also you can map network drive.
Access web console of your FreeNAS in browser i.e. http://192.168.2.5 (default user id- is admin and password freenas.)


After googling for a long I found somewhere, again thanks to the virtualization technology of the FreeNAS which is allowing you to configure your own Storage Server on VM or on the old physical PC's we have.
I will write you the detailed steps to install and configure FreeNAS for your home or office or lab.
- Installation of freeNAS.
Create a virtual machine with
4 vHDD’s (1gb and 8x3gb). or on you physical system with a CD
- Insert the CDROM into the system or attach the iso image to vm and boot from it. Once the media has finished booting, you will be presented with the console setup menu seen below:

Press enter to select the default
option of "1 Install/Upgrade to hard drive/flash device, etc.". The
next menu,
It will show you the list of hard
disks use your arrow keys to highlight the select the 1gb partition then tab to
OK and press enter. FreeNAS™ will issue the warning seen below, reminding you not
to install on a hard drive:

Press enter and FreeNAS™ will
extract the running image from the ISO and transfer it to the device. Once the
installation is complete,
Press enter and you'll return to
the first menu, reboot the system.
The first time you reboot
into FreeNAS™, you will be presented with the Console Setup screen

- CONFIGURING FreeNAS
select option 1 and enter
ip address to your freenas. Once IP address is assigned, it will display what
IP address can be used to access the graphical console. In the example seen the
FreeNAS™ system is accessible from http://192.168.2.5

FreeNAS™ supports the
Network File System (NFS) for sharing volumes over a network. Once the NFS
share is configured, clients use the mount command to mount the share.
Before configuring
NFS/windows Share on FreeNAS, we must select the drives we have added while
creating VM to do so…
1. Click on Storage tab then click on create volume
(label it as NFS).
2. Select a single drive and then click add volume.
format it with ZFS file system.
Configuring NFS is a
multi-step process that requires you to create NFS share(s), configure NFS, then start NFS in Services -> Control
Panel. It does not require you to create users or groups as NFS uses IP
addresses to determine which systems are allowed to access the NFS share.
- to create an NFS share, click Sharing -> Windows Shares -> Add Windows Share
- enter the details in fields as mentioned in screenshot rest leave as default.

(lot of
features are there like wise authentication, user rights etc etc. you can
configure this one is sample shairng)
Click ok.
How to configure FreeNAS as your SAN server.
For iSCSI there are
different configuration possibilities in FreeNAS 8. you can export the whole
disk as an iSCSI disk, and
so you will create a device extent.
On the FreeNAS website,
you can see more details on iSCSI feature. see that the file extent is slower than device extent.
A
quick quote from FreeNAS documentation:
A device extent allows a raw partition (volume) to be exported via iSCSI. The
advantage of device extent is that they are faster than file extents. The
disadvantage is that the entire volume is exported. If you only want to share a
portion of a volume using iSCSI, you will need to create a file extent instead.
A file extent allows you to export a portion of a volume. When creating a file extent,
you specify a file name that iSCSI clients will have access to (similar in
concept to a mount point) and the maximum size of that file (storage area). The
advantage of file extents is that you can create multiple exports per volume.
The
disadvantage is that they are slower than device extents.
This makes me think, in
my case, I better configure my individual SSD’s as an iSCSI targets and the
raid Z volume as an NFS …. -:)
Ok Let’s go and configure
one disk as an iSCSI Target. Not so difficult.
Access web console of your FreeNAS in browser i.e. http://192.168.2.5 (default user id- is admin and password freenas.)
1. Click on Storage tab then click on create volume (label
it as SAN).
2. Select a single drive or select multiple drives
then it will allows you to select RAID levels. In my case I have select two
drives as mirror (RAID level 1) then click add volume.
3. Select ZFS
file system and lick on add volume
01.
Portal group creation.
Go to the Portals >
Add Portal.

02.
iSCSI initiator.
Go to the menu
Initiators > Add Initiator.

The next step is to
create an iSCSI target.
03.
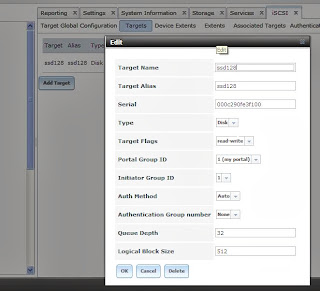
Create an iSCSI Target.
Menu Targets > Add
Target

Once the target created,
you must create an extent. As I mentioned before, file extent export a portion of a volume and its advantage that you can create
multiple exports per volume., so I go for it in this lab and create an extent.
04.
File Extent.
To add a device extent,
go to Services > ISCSI > Extents > Add Extent
In the example below I’m
creating a device extent for the whole SSD which has got a 128 Gigs of total
storage capacity.

05.
Target/Extent Association.
After the Extent
created, the next step is the Target-Extent association.
Once this done, one last step is to activate the iSCSI service.

06.Activate
the iSCSI service.
The iSCSI service can be
activated in this menu.


07.
Connecting the iSCSI (SAN) storage to Windows-XP.
1.
1. Download Microsoft iSCSI initiator from this link Run the setup follow the on screen wizard and
finish.
2. launch Microsoft iSCSi
initiator from your desktop click ADD target.enter ip address of your freeNAS,
leave default port
3. click
on target Tab then click on
logon button click Bind Volume
tab and click the bind all button
4. manage
the new volume from disk management. Just inititialize the disk as basic.
5. initialze
the disk as basic, format the disk and your iSCSI 1GB extent is showing as a
disk in Disk mgmt. Now your can do all things what you can on local disk.
No comments:
Post a Comment