Installing and configuring the PC and make it member
of your network whether it is new or old specially when you have to setup
new-office where no of systems needs to be install/configure, which includes
lot of activities to be carried out on all PCs likewise formatting the PC,
installing OS, configuring system, installing the dozens of applications,
configuring & patching them, installing printers and network configuration
etc. etc. which not only 2-3hrs time consuming job but a repetitive task on
number of computers is hectic/boring too.

2.b.5 Carry on through the wizard filling out the
relevant info. When you get to the end of the wizard there is no “Finish”
button, just use “Cancel” instead and save it to the sysprep folder.
 2.b.7. Click “Yes” to the agreement warning.
Step 4 – Capture the XP
image
 Note: that it will allow you to capture only the
partition which you have syspreped else
Note: that it will allow you to capture only the
partition which you have syspreped else


((Newer WIMs (like Vista or Win7) don’t care what HAL you have but XP is more picky. You can see the HAL type of your image by looking at the properties of it in the WDS console. Mine says acpiapic_mp, whereas another I created from a virtual machine is acpipic_up. The _up HAL only shows up on virtual machines but the _mp HAL from my physical Reference PC seems to work on motherboards in dc7700/ /dc7600 desktop’s.))
.
Microsoft's WDS (Windows Deployment Services). Many years ago I used Remote
Installation Services (RIS) on a Windows 2000 Server to install Windows 2000
Pro & XP to clients on my network during my mcse classes. Sometime in the
Windows Server 2003 timeframe RIS evolved into the much improved Windows
Deployment Services (WDS). I never used as time went on since never really
needed to use it, until the last month. I was given the old PCs to be used at
new-site which requires formatting, install fresh OS and dozens of applications
configuring them disabling the updates, applying patches, network
configuration, adding printers etc on every PCs to minimze the user complaints
on system performance. Which was very hectic and time consuming job to do on
repeated basis on each systems. WDS imaging was the only solution I found and
applying them over the
network seemed to be the easiest way to do this.
I was
wondering how things had changed now Windows 7/8 & Server 2008r2/2012 have
been released. I could remember it involving lots of huge downloads like the
Windows Automated Installation Kit (WAIK) and the Microsoft Deployment Toolkit.
So start googling and getting information on WDS which didn’t really seem to
bring any up to date information so I ended up piecing together the info from
lots of different blogs to get to the end result.
I have
included the steps I took in the attached file in case it is of any help to you
and is covered on x86 based image capturing/deployment.
Advantage
of WDS.
Ø
Deploy
systems in 10-15minutes inplace of 2-3hrs spending on it.
Ø
Need
not of sitting infront of each PCs and following the wizard is no more
required.
Ø
Need
not of external dvd/cd drive to install non cd/dvd drive based lapi/desktop.
Ø
Can
store different configuraion images i.e. lower/higher configuration systems.
Ø
Need
not of keeping bunch of cd/dvd installer.
STEP BY STEP GUIDE
Pre-requisites for WDS:
1.
Windows
Server 2003r2/2008/08r2 Machine/VM and adding WDS role for the server (mine
is VM)
2.
Boot image
(x86) you will find it in your windows7_x86 DVD at (D:\Source) folder with name boot.wim
3.
A Physical PC as reference PC ( to capture the image of the same for deployment) with
additional partition or usb storage media to save to image .wim file
4.
Sysprep Tools (get it from your XP-CD D:\SUPPORT\TOOLS
extract the deploy.cab file to C;\sysprep.
5.
All clients must
have PXE enabled (network boot feature)
Step 1 – Install WDS
1.a. Install the windows deployment
services role from add server role and accept all the defaults but you may want to install it to a disk with enough
space to store the images.
Once WDS installation completes open WDS console
from server manger.
1.b. We need to add a “Boot image” by right
clicking the Boot Image as shown in below screenshot, browse for the
D:\Source\boot.wim file to give WDS something to load when the client asks.
Give it a name like I used “Install Microsoft Windows XP (x86)”.
1.c. After it has been added, right-click the “Install
Microsoft Windows XP (x86)” boot image and choose “Create Capture Boot Image”. A new wizard starts. Give the
capture image mine like “PC Image Capture” and save it to
anywhere you like, before clicking finish you have a check box on the bottom of
wizard “add the image to boot image”
select it to add the image to boot image or same can be done manually by
locating it from the location where you have saved it and add it like you have
added the “Install Microsoft Windows XP (x86)” image file from wind7 dvd.
Step 2 – Create a Reference PC
Because we want to deploy Windows XP we have to
go through the creating a reference PC. With Vista and later you can just copy
an install.wim file from the DVD exactly like you did above when adding the
boot image.
2.a. Choose a spare PC and install Windows XP SP3,
all applications and printers etc. and make all configuration you needs.
2.b. Prepare the Reference PC for Capture. We need to
strip the reference PC of any unique names, Security Identifiers (SIDs) etc.
before we can capture it. we can use the SysPrep tool for the same as mentioned
in requirements above.
2.b.1. D-click the setupmgr.exe from sysprem folder in c: drive.
2.b.2. Type of Setup: Sysprep setup
2.b.3. Product: Windows XP Professional
2.b.4. License Agreement: covering this with No, do not fully automate the installation* / you can also
fully automate the same.
2.b.6. Double click the sysprep.exe from sysprep folder
2.b.7. Click “Yes” to the agreement warning. - Tick the
box “Use Mini-Setup”.
- Shutdown
Mode: Shutdown
- Click the
“Reseal” button.
Sysprep will do it’s
thing then shut down.
Now the image capturing of reference pc starts
here. If you have secondary partition exist to store the image file then ok
else attach you external usb drive to the physical pc.
4.a. Start the reference PC to Boot up. Press F9 to select boot option and select the
network boot option else make the network boot your first boot device from
BIOS.
4.b. Press F12 to launch the WDS. Be quick otherwise
the PC will load Windows and start going through the mini setup.
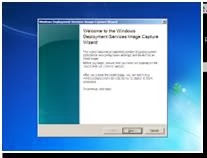
4.c. Choose “PC
Image Capture” (as shown in dos mode screenshot) from the WDS options.
Click Next on the capture wizard.
Note: that it will allow you to capture only the
partition which you have syspreped else
It will show you blank.
4.c.1. Select the C: from drop down list. Enter a location
by click the browse button type
A
file name for the image like I used below:
*** Install Windows XP-sp3 with Full AV &
Office 2007*** (for >1GB RAM)
*** Install Windows XP-sp3 with Basic
AV & Office 2007*** (for
<1gbram o:p="">
This process will take a while depending on how
big you image is. Mine took 10 minutes to capture a 1.8 GB image. Click finish
once complete.
4.c.2. let the pc restarts and follow the mini-setup
wizard and finish it, if you have saved you the capture image on secondary
drive of same (reference) PC and copy it to you external drive to upload on WDS
server else not need.
4.c.3 Open WDS console and right click on
Install Image then select add Install Image (as shown in below here. Brose for
the .WIM file you have copied in external drive and add the same.

Final Step: Deploying the IMAGE
This process is similar to the capture step
above.
1.
1.Boot from the network but this time choose the “Install
Microsoft Windows XP (x86)” option from the WDS screen as shown below. This
will load a GUI similar to the Windows 7 setup. It will list any images that
are compatible with the PCs HAL type.
((Newer WIMs (like Vista or Win7) don’t care what HAL you have but XP is more picky. You can see the HAL type of your image by looking at the properties of it in the WDS console. Mine says acpiapic_mp, whereas another I created from a virtual machine is acpipic_up. The _up HAL only shows up on virtual machines but the _mp HAL from my physical Reference PC seems to work on motherboards in dc7700/ /dc7600 desktop’s.))
2. 2. Select one of
the image we created and mentioned above from the list:
*** Install Windows XP-sp3 with Full AV &
Office 2007***
***
Install Windows XP-sp3 with Basic AV & Office 2007**
3. Click next the image deploying gets starts.
YOU HAVE DONE:
You can add drivers to image, multicast the single image in
order to reduce network traffic, etc with WDS.
No comments:
Post a Comment