Monday, November 30, 2015

Office Communicator Installation Failed

If you are installing MS Communicator on an Windows XP Workstation, but the installer is failing at the last phase of the install.  by SAYING "Microsoft Office Communicator 2005 was not installed". The installation was interrupted.
There will be no error logged in event manager.
This issue is causing by Microsoft HOTFIX KB974571 is applied on windows XP machine.
Removing this hotfix will resolve the issue. once the communicator installation is complete after removing this hotfix you can reinstall the hotfix on windows xp.

Tuesday, September 3, 2013

Storage (SAN/NAS) with FreeNAS

when i come across to buildup my own LAB to practice the VMware vSphere5.0 (Install, Configure & Manage) the entire setup installation and configuration AD, hypervisor were completed but when reached to the storage i.e. network storage then i got stucked as i was not having the SAN or NAS box to complete my lab exercises nor its cheap to procure for an individual for a while.

After googling for a long I found somewhere, again thanks to the virtualization technology of the FreeNAS which is allowing you to configure your own Storage Server on VM or on the old physical PC's we have.

I will write you the detailed steps to install and configure FreeNAS for your home or office or lab.

  • Installation of freeNAS.

Create a virtual machine with 4 vHDD’s (1gb and 8x3gb). or on you physical system with a CD
  1. Insert the CDROM into the system or attach the iso image to vm and boot from it. Once the media has finished booting, you will be presented with the console setup menu seen below:


Press enter to select the default option of "1 Install/Upgrade to hard drive/flash device, etc.". The next menu,
It will show you the list of hard disks use your arrow keys to highlight the select the 1gb partition then tab to OK and press enter. FreeNAS™ will issue the warning seen below, reminding you not to install on a hard drive:

Press enter and FreeNAS™ will extract the running image from the ISO and transfer it to the device. Once the installation is complete, 


Press enter and you'll return to the first menu, reboot the system.
The first time you reboot into FreeNAS™, you will be presented with the Console Setup screen


  • CONFIGURING FreeNAS

select option 1 and enter ip address to your freenas. Once IP address is assigned, it will display what IP address can be used to access the graphical console. In the example seen the FreeNAS™ system is accessible from http://192.168.2.5


FreeNAS™ supports the Network File System (NFS) for sharing volumes over a network. Once the NFS share is configured, clients use the mount command to mount the share.

Before configuring NFS/windows Share on FreeNAS, we must select the drives we have added while creating VM to do so…
1.     Click on Storage tab then click on create volume (label it as NFS).
2.     Select a single drive and then click add volume. format it with ZFS file system.
Configuring NFS is a multi-step process that requires you to create NFS share(s), configure NFS, then start NFS in Services -> Control Panel. It does not require you to create users or groups as NFS uses IP addresses to determine which systems are allowed to access the NFS share.
  1.  to create an NFS share, click Sharing -> Windows Shares -> Add Windows Share
  2.  enter the details in fields as mentioned in screenshot rest leave as default.

(lot of features are there like wise authentication, user rights etc etc. you can configure this one is sample shairng)
Click ok.

Go to services and click on button for CIFS. Browse your network place or directly enter UNC path for your share on NFS server and share name in my case \\192.168.2.5\winshare. Rest is yours also you can map network drive.

How to configure FreeNAS as your SAN server.
For iSCSI there are different configuration possibilities in FreeNAS 8. you can export the whole disk as an iSCSI disk, and so you will create a device extent.
On the FreeNAS website, you can see more details on iSCSI feature. see that  the file extent is slower than device extent.

A quick quote from FreeNAS documentation:
A device extent allows a raw partition (volume) to be exported via iSCSI. The advantage of device extent is that they are faster than file extents. The disadvantage is that the entire volume is exported. If you only want to share a portion of a volume using iSCSI, you will need to create a file extent instead.

A file extent allows you to export a portion of a volume. When creating a file extent, you specify a file name that iSCSI clients will have access to (similar in concept to a mount point) and the maximum size of that file (storage area). The advantage of file extents is that you can create multiple exports per volume.

The disadvantage is that they are slower than device extents.


This makes me think, in my case, I better configure my individual SSD’s as an iSCSI targets and the raid Z volume as an NFS …. -:)
Ok Let’s go and configure one disk as an iSCSI Target. Not so difficult.


Access web console of your FreeNAS in browser i.e. http://192.168.2.5 (default user id-  is admin and password freenas.)
1.     Click on Storage tab then click on create volume (label it as SAN).
2.     Select a single drive or select multiple drives then it will allows you to select RAID levels. In my case I have select two drives as mirror (RAID level 1) then click add volume.
3.     Select  ZFS file system and lick on add volume

01. Portal group creation.
Go to the Portals > Add Portal.
02. iSCSI initiator.
Go to the menu Initiators > Add Initiator.
The next step is to create an iSCSI target.

03. Create an iSCSI Target.
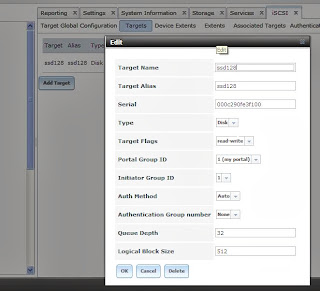
Menu Targets > Add Target
Once the target created, you must create an extent. As I mentioned before, file extent export a portion of a volume and its advantage that you can create multiple exports per volume., so I go for it  in this lab and create an extent.   

04. File Extent.
To add a device extent, go to Services > ISCSI > Extents > Add Extent
In the example below I’m creating a device extent for the whole SSD which has got a 128 Gigs of total storage capacity.

05. Target/Extent Association.
After the Extent created, the next step is the Target-Extent association. Once this done, one last step is to activate the iSCSI service.
06.Activate the iSCSI service.
The iSCSI service can be activated in this menu.


07. Connecting the iSCSI (SAN) storage to Windows-XP.

1.  


          1.   Download Microsoft iSCSI initiator from this link  Run the setup follow the on screen    wizard and finish.
2. launch Microsoft iSCSi initiator from your desktop click ADD target.enter ip address of your freeNAS, leave default port


3. click on target Tab                then click on logon button click Bind Volume tab and click the bind all button

4. manage the new volume from disk management. Just inititialize the disk as basic.

5. initialze the disk as basic, format the disk and your iSCSI 1GB extent is showing as a disk in Disk mgmt. Now your can do all things what you can on local disk.

Fasten the system depoyment in minutes inplace of hours with WDS

Installing and configuring the PC and make it member of your network whether it is new or old specially when you have to setup new-office where no of systems needs to be install/configure, which includes lot of activities to be carried out on all PCs likewise formatting the PC, installing OS, configuring system, installing the dozens of applications, configuring & patching them, installing printers and network configuration etc. etc. which not only 2-3hrs time consuming job but a repetitive task on number of computers is hectic/boring too.


. Microsoft's WDS (Windows Deployment Services). Many years ago I used Remote Installation Services (RIS) on a Windows 2000 Server to install Windows 2000 Pro & XP to clients on my network during my mcse classes. Sometime in the Windows Server 2003 timeframe RIS evolved into the much improved Windows Deployment Services (WDS). I never used as time went on since never really needed to use it, until the last month. I was given the old PCs to be used at new-site which requires formatting, install fresh OS and dozens of applications configuring them disabling the updates, applying patches, network configuration, adding printers etc on every PCs to minimze the user complaints on system performance. Which was very hectic and time consuming job to do on repeated basis on each systems. WDS imaging was the only solution I found and applying them over the network seemed to be the easiest way to do this.

I was wondering how things had changed now Windows 7/8 & Server 2008r2/2012 have been released. I could remember it involving lots of huge downloads like the Windows Automated Installation Kit (WAIK) and the Microsoft Deployment Toolkit. So start googling and getting information on WDS which didn’t really seem to bring any up to date information so I ended up piecing together the info from lots of different blogs to get to the end result.
I have included the steps I took in the attached file in case it is of any help to you and is covered on x86 based image capturing/deployment.

Advantage of WDS.
Ø  Deploy systems in 10-15minutes inplace of 2-3hrs spending on it.
Ø  Need not of sitting infront of each PCs and following the wizard is no more required.
Ø  Need not of external dvd/cd drive to install non cd/dvd drive based lapi/desktop.
Ø  Can store different configuraion images i.e. lower/higher configuration systems.

Ø  Need not of keeping bunch of cd/dvd installer. 

STEP BY STEP GUIDE

Pre-requisites for WDS:
1.       Windows Server 2003r2/2008/08r2 Machine/VM and adding WDS role for the server (mine is VM)
2.       Boot image (x86) you will find it in your windows7_x86 DVD at (D:\Source) folder with name boot.wim
3.       A Physical PC as reference PC ( to capture the image of the same for deployment) with additional partition or usb storage media to save to image .wim file
4.       Sysprep Tools (get it from your XP-CD D:\SUPPORT\TOOLS extract the deploy.cab file to C;\sysprep.
5.       All clients must have PXE enabled (network boot feature)
Step 1 – Install WDS
1.a. Install the windows deployment services role from add server role and accept all the defaults but you may want to install it to a disk with enough space to store the images.
Once WDS installation completes open WDS console from server manger.

1.b. We need to add a “Boot image” by right clicking the Boot Image as shown in below screenshot, browse for the D:\Source\boot.wim file to give WDS something to load when the client asks. Give it a name like I used “Install Microsoft Windows XP (x86)”.


1.c. After it has been added, right-click the “Install Microsoft Windows XP (x86)” boot image and choose “Create Capture Boot Image”. A new wizard starts. Give the capture image mine like “PC Image Capture” and save it to anywhere you like, before clicking finish you have a check box on the bottom of wizard “add the image to boot image” select it to add the image to boot image or same can be done manually by locating it from the location where you have saved it and add it like you have added the “Install Microsoft Windows XP (x86)” image file from wind7 dvd.

Step 2 – Create a Reference PC
Because we want to deploy Windows XP we have to go through the creating a reference PC. With Vista and later you can just copy an install.wim file from the DVD exactly like you did above when adding the boot image.

2.a. Choose a spare PC and install Windows XP SP3, all applications and printers etc. and make all configuration you needs.
2.b. Prepare the Reference PC for Capture. We need to strip the reference PC of any unique names, Security Identifiers (SIDs) etc. before we can capture it. we can use the SysPrep tool for the same as mentioned in requirements above.
2.b.1.  D-click the setupmgr.exe from sysprem folder in c: drive.
 2.b.2. Type of Setup: Sysprep setup
2.b.3. Product: Windows XP Professional
2.b.4. License Agreement: covering this with No, do not fully automate the installation* / you can also fully automate the same.
2.b.5 Carry on through the wizard filling out the relevant info. When you get to the end of the wizard there is no “Finish” button, just use “Cancel” instead and save it to the sysprep folder.

2.b.6. Double click the sysprep.exe from sysprep folder
2.b.7. Click “Yes” to the agreement warning.
  • Tick the box “Use Mini-Setup”.
  • Shutdown Mode: Shutdown
  • Click the “Reseal” button.
Sysprep will do it’s thing then shut down.


Step 4 – Capture the XP image
Now the image capturing of reference pc starts here. If you have secondary partition exist to store the image file then ok else attach you external usb drive to the physical pc.


4.a. Start the reference PC to Boot up. Press F9 to select boot option and select the network boot option else make the network boot your first boot device from BIOS.

4.b. Press F12 to launch the WDS. Be quick otherwise the PC will load Windows and start going through the mini setup.

4.c. Choose “PC Image Capture” (as shown in dos mode screenshot) from the WDS options.


Click Next on the capture wizard.
Note: that it will allow you to capture only the partition which you have syspreped else 
It will show you blank.

4.c.1. Select the C: from drop down list. Enter a location by click the browse button type

          A file name for the image like I used below:
           *** Install Windows XP-sp3 with Full AV & Office 2007***      (for >1GB RAM)
            *** Install Windows XP-sp3 with Basic AV & Office 2007***    (for <1gbram o:p="">
This process will take a while depending on how big you image is. Mine took 10 minutes to capture a 1.8 GB image. Click finish once complete.

4.c.2. let the pc restarts and follow the mini-setup wizard and finish it, if you have saved you the capture image on secondary drive of same (reference) PC and copy it to you external drive to upload on WDS server else not need.

4.c.3 Open WDS console and right click on Install Image then select add Install Image (as shown in below here. Brose for the .WIM file you have copied in external drive and add the same.


Final Step: Deploying the IMAGE
This process is similar to the capture step above.
1.     1.Boot from the network but this time choose the “Install Microsoft Windows XP (x86)” option from the WDS screen as shown below. This will load a GUI similar to the Windows 7 setup. It will list any images that are compatible with the PCs HAL type.

((Newer WIMs (like Vista or Win7) don’t care what HAL you have but XP is more picky. You can see the HAL type of your image by looking at the properties of it in the WDS console. Mine says acpiapic_mp, whereas another I created from a virtual machine is acpipic_up. The _up HAL only shows up on virtual machines but the _mp HAL from my physical Reference PC seems to work on motherboards in dc7700/ /dc7600 desktop’s.))
2.     2. Select one of the image we created and mentioned above from the list:

*** Install Windows XP-sp3 with Full AV & Office 2007*** 
      *** Install Windows XP-sp3 with Basic AV & Office 2007**
3.     Click next the image deploying gets starts.

YOU HAVE DONE:
You can add drivers to image, multicast the single image in order to reduce network traffic, etc with WDS.

Thursday, June 16, 2011

Blank Desktop after Logon (NoTaskbar No Desktop Icon at all)

When you log on to Windows XP, you may see a blank desktop without taskbar/icons. The issue of blank desktop is because of virus infection, which is changing registry key and terminating explorer to normal start-up. to get rid from it follow the best and simple method as mentioned below:
1. Download shell fix from this link. extract the zip file then double click / right click on SHELLFIX.Reg then select Merge from safe mode. or  Press CTRL-ALT-DEL

2. Select 'Task Manager'

3. Select 'File' menu

4. Select 'New Task'

5. In the opened dialog window input the path to the SHELLFIX.REG file.

6. Windows will ask you if you want to add information from the REG file to the Registry, answer 'Yes'

7. Restart your system and the problem will be solved.


Friday, June 10, 2011

Upgrade HDD without formatting/losing data and wasting your valuable time.

I would like to share an open source application/utility with you, which has not only get rid me from backup of entire data on old HDD, but has saved lot of times, OS installation, all other applications installations, my settings and data those I have on my old HDD to new HDD. All credit goes to “Clonezilla”. Thanks for the free open source application which has done a lot which sometimes doesn’t with purchased softwares.
What is Clonezilla?

Clonezilla is a free open source disk cloning application based on Debian. Like other disk cloning applications, Clonezilla copies the contents of a hard drive for transfer to another storage medium, such as another computer's hard drive or a removable medium, such as a DVD or a USB drive. Clonezilla is compatible with Windows, Macintosh and Linux operating systems.

There are two versions of Clonezilla, for single- or multiple-machine cloning. Clonezilla Live and Clonezilla SE (Server Edition). Here I am sharing you about Clonezilla Live. Clonezilla live is a small bootable GNU/Linux distribution for x86/amd64 (x86-64) based computers. It allows us to use CD/DVD or USB flash drive to boot and run clonezilla (Unicast only) (for complete details you can check Clonezilla Site.

How to install Clonezilla Live ?

Basic steps are to download pre-build Clonezilla Live then put it in a boot media (CD, USB drive).

· FOR CD/DVD:
a) Download an ISO file for CD/DVD and burn the iso file to a CD/DVD with any
burning program.
b) Attach your new HDD with system and Boot system from CD-ROM.
c) Follow the onscreen instcution.

· FOR USB DRIVE: (USB drive must 200mb free space with FAT formatted)

a) Download the Clonezilla Live zip file.

b) If you already have a partition of at least 200 MB in size on your USB flash drive formatted with a FAT file system then skip to the next step

c) Extract all the contents of the zip file to FAT16/FAT32 partition on your USB flash drive. Keep the directory architecture, for example, file "COPYING" should be in the USB flash drive's top directory (e.g. G:\COPYING).

d) Browse to your USB flash drive and as an administrator; click the makeboot.bat in the dir utils\win32\. WARNING! Makeboot.bat must be run from your USB flash drive. Otherwise on running from local hard drive can cause your MS windows not to boot!!!

e) Attach your new HDD with system and Boot system from USB Drive

f) Follow the on-screen instructions.

Its simple and easy na!!!!!!!!!!

Saturday, August 1, 2009

Malwarebytes' Anti-Malware Tool


Malwarebytes Anti-Malware is a surprisingly effective freeware antimalware tool. It's a relatively speedy malware remover, with the quick scan taking about 8 minutes even with other high-resource programs running. Malwarebytes' Anti-Malware can detect and remove malware that even the most well known anti-virus and anti-malware applications fail to detect. Malwarebytes' Anti-Malware monitors every process and stops malicious processes before they even start.

Key Features

  • Support for Windows 2000, XP, and Vista (32-bit and 64-bit).
  • Light speed quick scanning.
  • Ability to perform full scans for all drives.
  • Malwarebytes' Anti-Malware Protection Module.
  • more about and download

Wednesday, July 29, 2009

Windows XP Boot Screen / Image TIPS

There are several ways to approach changing the boot screen here i'll show you how to do it.
1st way to do it
To turn off the boot logo, Click Start > Run and type MSCONFIG. On the BOOT.INI tab, check the box next to /NOGUIBOOT and click OK. The next time you reboot your computer, you'll see the BIOS screen and then nothing until Windows loads completely. The downside to this option is you won't get any feedback if your PC gets hung up somewhere in the boot process.

2nd way to do it
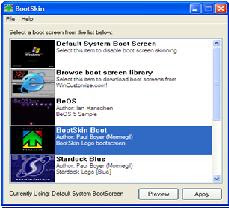
By replacing the boot image you can simply change the boot image with your desired one. The easy way to do this is to download a freeware app from WinCustomize called BootSkin. The utility automatically overrides the default Windows boot image with WinCustomize boot skin library.Download BootSkin.

3rd way:
1. Create a 215x147 .bmp file with 16 colors (NOT 16-bit) in any image editor. With your new image created, you need a freeware app called Resource Hacker to make some changes.
2. locate ntoskrnl.exe in your c:\Windows\system32 folder. Make a copy of the file called newntoskrnl.exe and leave the copy in the system32 folder. 3. Make a second copy of the ntoskrnl.exe on your desktop (this is the one you will edit).
4. Start Resource Hacker and open ntoskrnl.exe
5. Expand Bitmap > 5 and highlight the 1033 folder. Right-click the 1033 icon and choose Replace Resource.
Click the Open file with new bitmap button and locate the image you created earlier. Click the Replace button. Save and exit Resource Hacker.
6. Reboot into SafeMode and copy your newly created ntoskrnl.exe file into the Windows > system32 folder. !!!